How to remove AutoIT worm is one of the basic tools you need to know to have a virus free PC. I have here a simple step by step procedure which could help you remove that AutoIT worm in your PC.
Step – 1.Search the computer for "mschr.exe" by clicking Start > Search > All Files or Folders. Write down the location of the folder containing the files, as you will need this information later.
Step – 2.Remove the viral process using Windows Task Manager by pressing "Ctrl + Alt + Del" on the keyboard. Look for "mschr.exe" under Image Name. Highlight the viral process and click "End Process."
Step – 3.Delete any remaining virus files by clicking Start > Run > (type) cmd and click "OK." Type in the Dir:/folder name from Step 1. Example C:\%SYSTEMROOT%\system32\ Delete all the files by typing "del filename." Example: del mschr.exe
Step – 4.Edit the Registry by clicking Start > Run > (type) regedit and click "OK." Search the registry keys for the following and right click on each registry key and click "Delete."HKEY_LOCAL_MACHINE\SOFTWARE\Microsoft\Windows\CurrentVersion\explorer\Advanced\Folder\Hidden\SHO WALLCheckedValue = dword:00000000
HKEY_LOCAL_MACHINE\SOFTWARE\Microsoft\WindowsNT\CurrentVersion\SvcHost, netsvcs = %Previous data% and %Random%
HKEY_LOCAL_MACHINE\SYSTEM\CurrentControlSet\Services\[random]\ParametersServiceDll = %MalwarePath%
And that’s it. A four step to have you AutoIT virus free PC.
Tuesday, October 27, 2009
Wednesday, October 21, 2009
How to Remove Malware (Rogue Anti-virus)
This article is about how to remove a Malware on your PC. The most common Malware you will encounter is a Rogue Anti-Virus. For beginners it will quite hard to remove manually but I have here a step by step procedure on how you yourself could remove that nasty Malware on your PC. There of course many applications that find and remove rogue anti-virus applications however there are times where you might need to manually remove the rogue. Here's my step by step procedure on how to do it.
Terminating the process:
Step – 1.Click CTRL-ALT-DELETE (if it's available)
Step – 2.Click Task Manager
Step – 3.Click Processes
Step – 4.Find a process that usually contain all numbers. For example 2342342.exe. If you do not see all numbers then your rogue has a name like...SystemSecurityPro.exe or GreenAV.exe...etc.
Step – 5.Select that process and click end process.
Step – 6.At this point the rogue process has been terminated.
Removing Rogue Anti-virus that is named with random numbers.
Step – 1.Click Start
Step – 2.Click Run (or for Vista type in the start search box)
Step – 3.For windows xp type: C:\documents and settings\all users\Application Data and click OK. A window will open containing a folder with about 8 numbers. Your Rogue is in there. Delete that folder.
Step – 4.For Windows Vista type C:\users\all users in the "start search" box and click enter. Your randomly named folder with about 8 digits should be in there. Delete it.
Removing Rogue Anti-Virus that has a name like System Guard Pro, AV2010, etc
Step - 1.Open Windows Explorer.
Step - 2.Open your C:\ drive.
Step - 3.Open Program Files
Step -5.Find the Rogue and Delete the folder.
Now you can enjoy using your PC without any Rogue visitors…
Monday, October 19, 2009
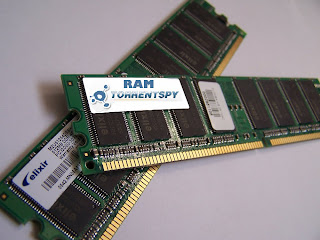
Upgrade Your PC’s RAM
To upgrade your PC’s random-access memory (RAM), you must know the type of RAM it uses, how the RAM is presently configured and how many open RAM slots are available. Upgrade is done to increase the speed and performance of your PC. Here’s my step by step prescription on how you yourself can upgrade your PC’s RAM.
Step - 1. Check the owner's manual or motherboard manual to determine if RAM is parity or non-parity. The website of the company you purchased the computer from usually will tell you what kind of memory your computer needs as well.
Step - 2. Find out the speed of RAM (for example, 60 nanoseconds). You can see it by right clicking on your desktop and click on properties.
Step - 3. Determine whether the computer uses single in-line memory modules (SIMMs) or dual in-line memory modules (DIMMs).
 Step - 4. Find out whether the computer uses regular, FPM, EDO, or Synch DRAM.
Step - 5. Determine the number of pins on the motherboard: 30, 72 or 168.
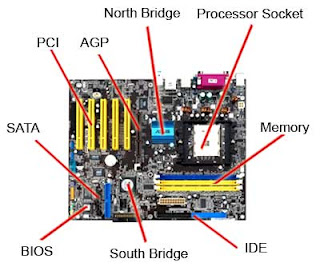
Step - 6. Remove the cover from the machine to find the number of open RAM slots. Look for between two and eight same-sized parallel sockets on the main circuit board. Usually at least two of those sockets will contain RAM - ruler-shaped circuit boards with chips on one or both sides.
Step - 7. Purchase additional RAM that matches existing memory specifications. You can choose from 512MB, 1GB or 2GB. The greater the bytes the better.
Step - 8. Discharge yourself by grabing on any metal. Carefully place your RAM on the slot. If your Motherboard has 3 slots thats good. yur can put 3 RAM at a time. That makes your PC a lot faster.
Step - 9. Place everything back to normal and restart. Observe the changes made by upgrading your RAM.
I hope you like this simple tutorial on how to upgrade RAM.
Step - 1. Check the owner's manual or motherboard manual to determine if RAM is parity or non-parity. The website of the company you purchased the computer from usually will tell you what kind of memory your computer needs as well.
Step - 2. Find out the speed of RAM (for example, 60 nanoseconds). You can see it by right clicking on your desktop and click on properties.
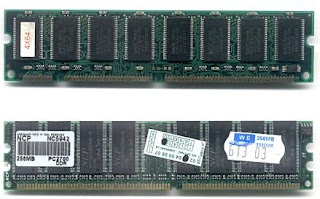
Step - 3. Determine whether the computer uses single in-line memory modules (SIMMs) or dual in-line memory modules (DIMMs).
SIMMs - or single in-line memory module, is a type of memory module containing random access memory used in computers from the early 1980s to the late 1990s.
It differs from a dual in-line memory module (DIMM), the most predominant form of memory module today, in that the contacts on a SIMM are redundant on both sides of the module. SIMMs were standardised under the JEDEC JESD-21C standard.
DIMMs - or dual in-line memory module, comprises a series of dynamic random access memory integrated circuits. These modules are mounted on a printed circuit board and designed for use in personal computers, workstations and servers. DIMMs began to replace SIMMs (single in-line memory modules) as the predominant type of memory module as Intel's Pentium processors began to gain market share.
 Step - 4. Find out whether the computer uses regular, FPM, EDO, or Synch DRAM.
Step - 5. Determine the number of pins on the motherboard: 30, 72 or 168.
Step - 6. Remove the cover from the machine to find the number of open RAM slots. Look for between two and eight same-sized parallel sockets on the main circuit board. Usually at least two of those sockets will contain RAM - ruler-shaped circuit boards with chips on one or both sides.
Step - 7. Purchase additional RAM that matches existing memory specifications. You can choose from 512MB, 1GB or 2GB. The greater the bytes the better.
Step - 8. Discharge yourself by grabing on any metal. Carefully place your RAM on the slot. If your Motherboard has 3 slots thats good. yur can put 3 RAM at a time. That makes your PC a lot faster.
Step - 9. Place everything back to normal and restart. Observe the changes made by upgrading your RAM.
I hope you like this simple tutorial on how to upgrade RAM.
Sunday, October 11, 2009
Customize Your Desktop Icon
You want to customize your desktop icon?When you own something you want it to look just the way you want it. Like your Pc, before you buy it you choose among those hundreds of designs and configurations. In this part, customization takes place. I have here a simple way which you can perform to customize your pc without much effort at all. You'll learn how to customize desktop icons in 8 easy steps. Let’s get started.
Step – 1. Download any icons you want, there are tons of icons available for download on the Web. Your favorite search engine should provide a number of places to download icons. Some of my favorite sources include iconarchive, icondock, freeiconsweb.
Step – 2. Create folder for your icons. After downloading icons put it some place where you could leave them untouched and easy to find. I put mine on My Documents and named the folder icons. Decide what icons you want to change and what icon you would use to replace it.
Note that there are the standard icons (My Computer, My Documents, and the Recycle Bin, plus a folder called Miscellaneous, and two shortcuts.
Step – 3. Click Start, click Control Panel, click Appearance and Themes, and under Pick a task, click Change the desktop background.
Step – 4. On the Desktop tab of the Display Properties dialog box, click Customize Desktop.
Step – 5. In the Desktop Items dialog box, shown in figure 3, select the icon you want to change and click Change Icon. The Change Icon dialog box opens, which shows all icons in the currently selected file. In it, you can specify which icons are shown on the desktop by default. I selected the My Computer, My Documents, and Recycle Bin icons.
Step – 6. To select from icons not currently displayed, click Browse, and in the Change Icon dialog box, navigate to the icons you downloaded, select the icon you want to use, click Open, and then click OK
Step – 7. In the Desktop Items dialog box, select the next icon you want to change and repeat steps 3–4.
Step – 8. When you're finished changing the icons listed here, click OK, and in the Desktop Properties dialog box, click OK to apply the changes.
Additional tips
Customize your desktop folder icon
Step – 1. Right-click the folder, and then click Properties.
Step – 2. On the Customize tab, click Change icon.
Step – 3. In the Change Icon dialog box, click Browse, navigate to the new icon you want to use, select it, and then click Open.
Step – 4. Click OK, and then click OK again to apply the change.
To customize a shortcut icon
Step – 1. Right-click the shortcut you want to customize, and then click Properties.
Step – 2. On the Shortcut tab, click Change Icon.
Step – 3. In the Change Icon dialog box, click Browse, navigate to the new icon you want to use, select it, and then click Open.
Step – 4. Click OK, and then OK again to apply the change.
Thursday, October 8, 2009
Troubleshooting Memory Failures With Beep Codes
One of the most case of failure among your pc is the memory failure. Power-on-self-test “POST” of the BIOS on your motherboard during power up is one way to determine if your pc memory is in trouble. Different manufacturers assign different beeping sounds that will identify the status of your memory. There are 3 basic BIOS developer today, the most popular BIOS is made by “American Mega-trend” - AMI, Award and Phoenix BIOS. I will provide you the beep code for the AMI & Award BIOS developer unfortunately I cant provide you the beep reference code for phoenix. I’m sorry.
Here are the Award BIOS Beep Codes:
1 Long Beep tone - Memory Problem
1 Long Beep and 2 Short Beeps - DRAM Parity failure
1 Long Beep and 3 Short Beeps - Video error
Continuous Beep tone - Memory or Video memory failures
AMI BIOS Beep Codes :
1 Beep tone - DRAM refresh failure
2 Beep tone - DRAM Parity failure
3 Beep tone - Base 64K RAM failure
4 Beep tone - System timer error
5 Beep tone - CPU failure
6 Beep tone - Keyboard controller error
7 Beep tone - Virtual mode error
8 Beep tone - Display memory read/write error
9 Beep tone - ROM BIOS checksum error
10 Beep tone - CMOS register read/write error
11 Beep tone - Cache memory error
Continuous Beep tone - Memory or Video memory failures
The normal procedure is to power up the PC system, watch for error message on the monitor screen and listen to the PC beep tone. A single beep during boot-up process is normal and does not indicate a failure if the system continues to boot-up.
Heres my prescription of the day.
Are you having this kind of problem? You have a regular memory sizing error during POST (bootup), how should you trouble shoot the failure ?
Ok, heres the step by step procedure to troubleshoot that problem. In most cases hardware failures are caused by the natural aging process of the memory components, defective memory module socket, dirty contacts, cold solder joints during assembly and memory module not seated properly in the socket due to vibration. It is important to pay attention to intermittent memory failure, before you make any expensive decision to replace the expensive memory - try cleaning the memory module contacts for both old and new ram to see if the problem can be fix:
Step – 1. Ensure environment is static safe by removing any unwanted plastic, bags from your workbench. Keep the computer system plugged into your AC unit but ensure that the power switch on the PC is turned off. Keeping the PC plugged in the AC will ensure that case is grounded thus reducing the possibility of damaging the module or system from ESD (Electro Static Discharge)
Step – 2. After removing the casing cover, ground yourself by touching any of the metal surfaces on your computer casing. Doing this step discharges any static built up on your body and clothing.
Step – 3. Visually locate the computer memory expansion slots. This is normal visible but if in doubt, refer to your operation manual instruction book.
Step – 4. The first thing to do is to remove the memory module and perform some visual inspection to check the memory socket which sits the memory module. Make sure all the pins are straight, no cracks or broken pins must be found.
A Wet the end of a cotton swab with the solvent, the swab should be wet but not dripping B Using a circular motion, clean the contacts on the memory module. C Allow the contact surface to dry thoroughly. D Replace the memory module into the socket. E Repeat steps B through D for each module you have. F Power on the computer to test the RAM. G If you see no memory errors, replace the PC's case and power-up away.
Additional Tips:
Step – 5. While contact cleaner is preferred, it is also a well-known trick that you can also clean contacts with a pencil eraser. 6. Continuing RAM errors are usually a sign of a bad memory module. If cleaning the contacts doesn't solve your problem, try to isolate the faulty module and replace it.
Wednesday, October 7, 2009
Remove Autorun Virus from Your Hard Disk Drive
Have you encountered a problem on your pc that when you double click your hard disk drive and it doesnt open, instead, a window appear and said that you must choose what program to use to open your hard disk drive?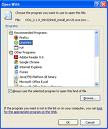
Well, you have a nasty visitor on your pc. Its a virus not able to clean by your antivirus no matter how hard you deep clean it.
Ok, Ill share you a simple step by step procedure to remove that nasty virus on you pc. Follow my instructions.
Step - 1. Open command prompt. Go to Windows, then Run, and type "cmd" . Press enter.
Step - 2. Type "cd\" and press enter to get to the root directory of c:\ .
Step - 3. Type "attrib -h -r -s autorun.inf" and press enter.
Step - 4. Type "del autorun.inf" and press enter.
Step - 5. Repeat the same process with other drives, type "d:" and do the same thing. then next "e:".and restart your computer.
Step - 6. Restart your computer and it's done. Enjoy the freedom to open hard drives on a double click.
Monday, October 5, 2009
How to Maintain a Virus Free and Worm Free Windows PC
The No. ! enemy of our pc is the virus, with it on our pc, our files are in danger so it is better to keep our pc virus free and worm free, How to do that? Check it out here. There are many viruses and worms out there that could infect your computer. Some are harmless, but, they do have the capacity to do any number of nasty things, up to and including, erasing all data from your computer. Here's the step by step procedure on how to keep those nasty critters off your PC!
Step - 1. Email is the most common way of getting infected. While you can safely open any mail, NEVER NEVER NEVER click on a link in email that you are not positive is from a trusted source! Here are two common scenarios:
Step - 1. Email is the most common way of getting infected. While you can safely open any mail, NEVER NEVER NEVER click on a link in email that you are not positive is from a trusted source! Here are two common scenarios:
- You get an email from someone you DON'T know. You open it. It tells you (or, persuades you) to click on a link in the email. You do so. Bingo, that is when you get infected. Frequently, the email appears to be from your bank, a company you know, etc. Don't fall for it! It was actually malicious code executed in your browser that allowed it to look like it is coming from an actual business. A good way to avoid this is to use Mozilla Firefox, for the have are known to be more secure. Businesses (almost) never send unsolicited email.
- You get (what appears to be) an email from someone you DO know. But, unknown to you, a virus or worm generated that email (and not your friend). It could be, your friend's PC is infected, but, not always. Obviously, the actual email writer doesn't know you and cannot say anything personal to you, so, typically, it says something like "Click on this link for some important information..." etc. Bingo! Infected!
Step - 2. Don't click on pop-up windows that announce a sudden disaster in your city! A cracker (Crackers hack people with evil intent, hackers don't do things to damage your property, or steal data on it in any way. To confuse the terms will make many angry). has used your IP (Internet Protocol) address to determine your location. He then display a headline that you will be very tempted to click on, in order to learn more about "the tornado that just struck your city" (or similar). You click...bingo...infected!
Step - 3. Be careful about using MS Outlook. Outlook is more susceptible to worms than other e-mail programs, unless you have efficient Anti-Virus programs running. Use Pegasus or Thunderbird (by Mozilla), or a web-based program such as Hotmail or Yahoo (In Firefox).
Step - 4. Install an Anti-Virus program(ex. Norton, F-Secure, Sophos or McAfee.) Also available is the free AntiVir virus scanner. Make sure you keep your virus definitions updated and run a full system scan weekly.
Step - 5. Install an Anti-Spyware program(ex. Ad Aware SE, Windows Defender), that operates against internet malware and spyware. Just like Anti-Virus, keep it updated, and do a full system scan weekly.
Step - 6. If someone sends you an attachment in e-mail or instant messaging, do not open it. If it is a picture, text or sound file (these attachments end in the extensions .txt, .jpeg, .gif, .bmp, .tif, .mp3, .htm, .html, and .avi), you are probably safe, but still do a scan before opening. Many crackers know that people trust documents like those and the go out of there way to make you regret opening them. High risk file extensions include .exe, .bat, and .vbs, for their main purposes are to execute code, so the file openly admits that something will happen. You can negate the risk by preforming scans with your antimalware AND antivirus. If someone you know very well sends you a Word attachment or other type of file, e-mail them to ask them if they meant to send it to you. If they say yes, you can open it, but you might still be at risk if they are not good about running Anti-Virus scans or careful about what they download. Be wary of attachments with a double extension, such as .txt.vb or .jpg.exe, as the system will only recognize the extension to the extreme right, and run the file as such. Double extensions exploit an option in Windows to hide known file extensions thus hiding the second dangerous extension and showing only the first safe extension. Ensure that this options is disabled to more easily identify these files. Double extensions are often a good indicator that the file is malicious.
Step - 7. Do not use disks that other people gave you, even from work. The disk could be infected with a virus. Of course, you can run a virus scan on it first to check it out, but AV programs are not 100% effective. If the disk (especially if its a hard disk) can be wiped using a bootable CD like DBAN (Google DBAN and you will see the page) and then the drive will be completely safe. Disable any autorun options so that you can scan contents of the disk before executing them.
Step - 8. Do not download software from just any old website. If it is a reputable site that you trust, you are probably safe. The threat is not only from software; don't download Word documents or other non-HTML files that have something other than one of the extensions listed above, either.
Step - 9. Set up your Windows Update to automatically download patches and upgrades. This will allow your computer to automatically download any updates to both the operating system (I.E Windows) and Internet Explorer. These updates fix security holes in both pieces of software.
Step - 10. Consider switching to a different web browser. Other web browsers (such as Firefox or Opera) are considered to have better security than Internet Explorer; some people also see them as more flexible and extensible browsers.
Step - 11. Be careful when surfing. You can get a malicious script from a webpage and not know it. If you have your IE set up for the maximum security settings, you are probably safe. You can try disabling javascript, but it may also break benign functionality on reputable websites. If you ever get a window asking if you want to allow an automatic install, say "No" unless you know the site requesting the install. Also, don't go to any porn sites. Those are almost always viruses.
Step - 12. Read about the latest virus threats so you are aware of the potential danger. Go to Symantec's page to read about them daily.
Step - 13. Try to balance paranoia with common sense. Some people get really weird about viruses, spyware, etc. It's just a computer! Back up your data and follow these steps, and it shouldn't be a big problem. Some people would suggest that you make sure you have a firewall and run anti-spyware programs as well. I'm not sure either of those will protect you from viruses, but they will protect you from cracking and from spyware. Microsoft's Antispyware and Ad-Aware are the best anti-spyware/virus programs I have found. Good luck!
Step - 14. Use a software firewall! Even if you have a hardware firewall, always use a software firewall (ex. Norton, Mcafee, there's also free ones- ZoneLabs ZoneAlarm).
Step - 15. Scan things you download! Be a total nut with this. Scanning new files is cheap, fast, and easy. Even if the file came from a trusted source, their computer might have been compromised without their knowledge. Anything you get from P2P software you should scan, as you are getting it from a stranger.
Step - 16. Stay away from file-sharing sites. Sites that distribute illegal versions of software (sometimes referred to as cracks), music, or "free movies" are known to be riddled with virii and trojans. This include torrents or other forms of P2P activities. Staying away from these sites is in your computer's health's best interest, as well as a good way to avoid being sued for copyright violation.
- If you do choose to partake in these illegal activities, check the filesize before downloading. Movies shouldn't be .EXEs or 24K.
Sunday, October 4, 2009
Buy Your First Computer
Computers vary on different qualifications and qualities but for beginners it is best based among their needs. A computer for an office worker differs from a computer for a web enthusiast. Here are the step by step procedure which you could use when you buy your own computer.
Step 1 - Make a budget. Think about how much money you are willing to pay for a computer. If you want a good looking and fast one, better prepare extra money.
Step 2 - What purpose will it serve. If it is for basic applications like word processing, then look for a cheap model. If you want to play games, you'll need something with a fast processor, lots of RAM, a large hard drive, and good sound and graphics cards.
Step 3 - Where will it be used. If you need to take it all over the place, you'll need a laptop. If you intend to leave it in the office or at home on the desk, then buy a desktop.
Step 4 - Who is going to use it? If it's for an office and you have to share it, you might need one with more memory and Vista Business or Ubuntu. If you will be the only one using it, and mostly for playing games, then Vista Home Basic or Premium will serve you well.
Step 5 – Choose an operating system. Operating systems vary from their styles, formats, appearances. You can buy computers that don’t have operating system intall on them, don’t buy those. Choose what you are comfortable to work with.

 Step 6 - Choose the hardware. Decide whether you want a desktop machine, a laptop that you can take with you, or a netbook. A netbook is a smaller version of the laptop but more portable and with fewer built-in devices such as CD and DVD drives.


Step 7 – Decide on the amount of memory. Decide how much RAM memory you want your computer to have. Technically, the amount of RAM memory dictates the speed of your computer. Many software have a minimum RAM requirement in order to run. So if your software say it requires 2 GB of memory, and your computer has only one GB of memory, it will not run. The more RAM the better, but it will be more expensive. You should at least have 2 GB or more RAM, unless the only thing you are using the computer for is connecting to the internet (in which case you can do with only 1 GB).
Step 1 - Make a budget. Think about how much money you are willing to pay for a computer. If you want a good looking and fast one, better prepare extra money.
Step 2 - What purpose will it serve. If it is for basic applications like word processing, then look for a cheap model. If you want to play games, you'll need something with a fast processor, lots of RAM, a large hard drive, and good sound and graphics cards.
Step 3 - Where will it be used. If you need to take it all over the place, you'll need a laptop. If you intend to leave it in the office or at home on the desk, then buy a desktop.
Step 4 - Who is going to use it? If it's for an office and you have to share it, you might need one with more memory and Vista Business or Ubuntu. If you will be the only one using it, and mostly for playing games, then Vista Home Basic or Premium will serve you well.
Step 5 – Choose an operating system. Operating systems vary from their styles, formats, appearances. You can buy computers that don’t have operating system intall on them, don’t buy those. Choose what you are comfortable to work with.
- Linux (Ubuntu, Debian, Fedora, OpenSuse and Mandriva) is stable, fast and free.
- Microsoft Windows (98, XP, Vista, 7) is the most popular platform in general and for gaming.
- Mac OS X (Tiger, Leopard, Snow Leopard) is popular for creative endeavours and multimedia.
 Step 6 - Choose the hardware. Decide whether you want a desktop machine, a laptop that you can take with you, or a netbook. A netbook is a smaller version of the laptop but more portable and with fewer built-in devices such as CD and DVD drives.

Step 7 – Decide on the amount of memory. Decide how much RAM memory you want your computer to have. Technically, the amount of RAM memory dictates the speed of your computer. Many software have a minimum RAM requirement in order to run. So if your software say it requires 2 GB of memory, and your computer has only one GB of memory, it will not run. The more RAM the better, but it will be more expensive. You should at least have 2 GB or more RAM, unless the only thing you are using the computer for is connecting to the internet (in which case you can do with only 1 GB).
Step 8 – Research. Scan the Internet, and become more knowledgeable. Compare prices, and whether the computer can be upgraded as needed. Then you are ready to order, either online, or in a computer store.
Friday, October 2, 2009
How to install Windows Vista
For those who had experience on installing windows xp it would be easier for them to install vista. But for beginners you might want to read this article. Windows Vista DVD is bootable. In order to boot from the DVD you need to set the boot sequence. Look for the boot sequence under your BIOS setup and make sure that the first boot device is set to CD-ROM/DVD-ROM. Lets start, follow the step by step procedure and with hustle free your problem will be easily solved.
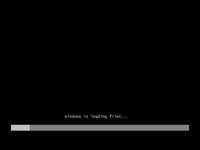
Step 1 - Place Windows Vista DVD in your dvd-rom drive and start your PC. Windows Vista will start to boot up and you will get the following progress bar.
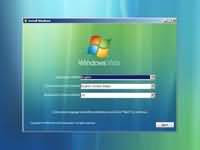
 Step 2 - The next screen allows you to setup your language, time and currency format, keyboard or input method. Choose your required settings and click next to continue.
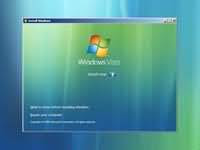
 Step 3 - The next screen allows you to install or repair Windows Vista. Since we are doing a fresh install we will click on "install now".
 Step 4 - You can now type the product key that came with your Windows vista.
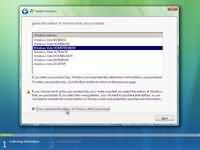
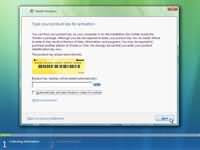 Step 5 - If you do not enter the product key you can still proceed with the installation in which case Windows will ask you which version of Vista you have purchased. Windows Vista Home Basic, Home Premium, Ultimate, Business etc. Select the version you have purpixchased and click next.
Please note, although you can select any version of Windows and proceed to next stage. It is not good idea to select a different version to the one you have purchased becuase you will not be able to activate Windows at a later stage. Windows Vista can detect which version you have purchased once you enter your product key.
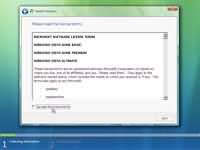
 Step 6 - Tick "I accept the licence terms" and press next.
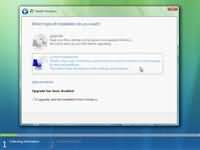
 Step 7 - Choose the type of installation you want to perform. You will notice that upgrade option is disabled as we have booted from the DVD-R. Therefore we can only select Custom (advanced) option which basicly installs a clean copy of Windows from scratch.
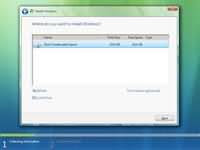
 Step 8 - Choose where you would like to install Windows Vista. If you have a new upartitioned hard drive you would get your hard drive listed as shown on the image below. If have have an old hard drive with data or other partitions it will show up as logical drives. You can select the drive options (advaced) to format, delete, or create new partions. Because I am using a single new hard drive i will select next to continue. Windows will create a partition and format it using NTFS files system.
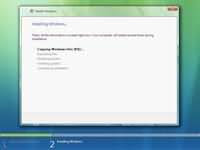
 Step 9 - Windows starts the installation process and starts copying all the necessary files to your hard drive as shown on the image below. It will go through various stages of the setup and will reboot your system few times. When your PC reboots it attempts to boot from CD as its the first boot device. Do not press any key during the boot prompt so Windows Vista will continue with the installation by booting from your hard drive.
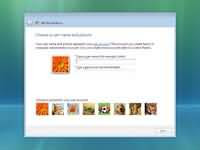
 Step 10 - After installation copy process is complete you are presented with the Setup Windows dialogue box as show below. At this stage you need to choose a user name, password and a picture for your user account. The account you create here is the Administrator account which is the main account for your Windows Vista that has all the privilages. Click next continue
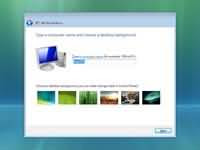
 Step 11 - Now you need to choose your computer name and desktop background. Click next to continue.
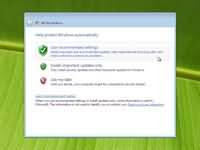
 Step 12 - Choose wether your want to Help protect Windows automatically. Select "Use recommened settings" to continue.
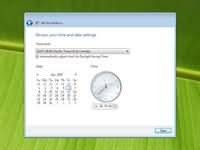
 Step 13 - Review your time and date settings. Select your time zone, correct the date and time and click next to continue.
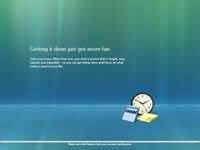
 Next screen presents you to select your computers current location. You can choose between home, work, public location. Choose home to continue. You will finally get a "Thank you" screen which confirms the end of the interactive installation process. This is not the end of the setup process. There are still many after installation configuration to be done. Click next to continue.
Step 14 - Windows now runs a benchmark type of application which checks the performance of your system. You will see a status bar at bottom which shows the progress. Once the process is complete you will be presented with the logon screen.
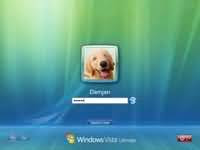
 Step 15 - Finally you have the logon screen. Just type your password and press enter or click on the arrow to logon to Windows Vista for the first time.
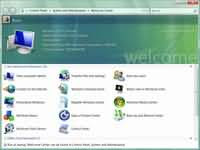
 Step 16 - Soon as you logon you will be presented with welcome centre. You can use the welcome centre to configure, customise, and update Windows vista.
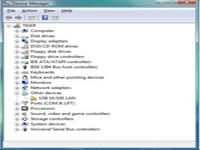
 Step 17 - Finally you need to check if all your hardware has been detected correctly. You can do so by checking your device manager. To access device manager click Start menu -> Control panel -> System -> Device manager. You will see all your hardware listed as shown below. You need to check if you have any yellow exclamtion marks next to the name of the device similar to "USB 10/100 LAN" on image below. This indicates the driver has not been installed for this device.
At this stage you need to install Windows Vista drivers by double clicking on "USB 10/100 LAN" or your device. The properties dialog box will appear. Click on Reinstall Driver. Then you can choose wether you want to install the driver from the internet (if available) or install manually from a CD or other media
Once you have removed all the yellow exclamtion marks from the device manager your Windows Vista configuration would be fully complete.
Step 1 - Place Windows Vista DVD in your dvd-rom drive and start your PC. Windows Vista will start to boot up and you will get the following progress bar.
Step 2 - The next screen allows you to setup your language, time and currency format, keyboard or input method. Choose your required settings and click next to continue. Step 3 - The next screen allows you to install or repair Windows Vista. Since we are doing a fresh install we will click on "install now". Step 4 - You can now type the product key that came with your Windows vista. Step 5 - If you do not enter the product key you can still proceed with the installation in which case Windows will ask you which version of Vista you have purchased. Windows Vista Home Basic, Home Premium, Ultimate, Business etc. Select the version you have purpixchased and click next.Please note, although you can select any version of Windows and proceed to next stage. It is not good idea to select a different version to the one you have purchased becuase you will not be able to activate Windows at a later stage. Windows Vista can detect which version you have purchased once you enter your product key.
Step 6 - Tick "I accept the licence terms" and press next. Step 7 - Choose the type of installation you want to perform. You will notice that upgrade option is disabled as we have booted from the DVD-R. Therefore we can only select Custom (advanced) option which basicly installs a clean copy of Windows from scratch.Step 8 - Choose where you would like to install Windows Vista. If you have a new upartitioned hard drive you would get your hard drive listed as shown on the image below. If have have an old hard drive with data or other partitions it will show up as logical drives. You can select the drive options (advaced) to format, delete, or create new partions. Because I am using a single new hard drive i will select next to continue. Windows will create a partition and format it using NTFS files system. Step 9 - Windows starts the installation process and starts copying all the necessary files to your hard drive as shown on the image below. It will go through various stages of the setup and will reboot your system few times. When your PC reboots it attempts to boot from CD as its the first boot device. Do not press any key during the boot prompt so Windows Vista will continue with the installation by booting from your hard drive. Step 10 - After installation copy process is complete you are presented with the Setup Windows dialogue box as show below. At this stage you need to choose a user name, password and a picture for your user account. The account you create here is the Administrator account which is the main account for your Windows Vista that has all the privilages. Click next continue Step 11 - Now you need to choose your computer name and desktop background. Click next to continue. Step 12 - Choose wether your want to Help protect Windows automatically. Select "Use recommened settings" to continue. Step 13 - Review your time and date settings. Select your time zone, correct the date and time and click next to continue. Next screen presents you to select your computers current location. You can choose between home, work, public location. Choose home to continue. You will finally get a "Thank you" screen which confirms the end of the interactive installation process. This is not the end of the setup process. There are still many after installation configuration to be done. Click next to continue.Step 14 - Windows now runs a benchmark type of application which checks the performance of your system. You will see a status bar at bottom which shows the progress. Once the process is complete you will be presented with the logon screen.
Step 15 - Finally you have the logon screen. Just type your password and press enter or click on the arrow to logon to Windows Vista for the first time. Step 16 - Soon as you logon you will be presented with welcome centre. You can use the welcome centre to configure, customise, and update Windows vista. Step 17 - Finally you need to check if all your hardware has been detected correctly. You can do so by checking your device manager. To access device manager click Start menu -> Control panel -> System -> Device manager. You will see all your hardware listed as shown below. You need to check if you have any yellow exclamtion marks next to the name of the device similar to "USB 10/100 LAN" on image below. This indicates the driver has not been installed for this device.At this stage you need to install Windows Vista drivers by double clicking on "USB 10/100 LAN" or your device. The properties dialog box will appear. Click on Reinstall Driver. Then you can choose wether you want to install the driver from the internet (if available) or install manually from a CD or other media
Once you have removed all the yellow exclamtion marks from the device manager your Windows Vista configuration would be fully complete.